Saturday, September 10, 2011
Creating a children's book: Sketch Phase: CLAY TIME!
Creating a children's book: Sketch Phase: CLAY TIME!: I need to feel my characters are more alive....like they really exist and are with me right in my studio. They need to feel like a real dog...
Sketch Phase: CLAY TIME!
I need to feel my characters are more alive....like they really exist and are with me right in my studio. They need to feel like a real dog and a real boy (even though they are just made up in my imagination).
How can I do this?
CLAY TIME!
Clay has helped me many times and it will help me once again in this book. When I feel my characters are real, then it is easier for me to draw them from different directions...and to get the correct shadows from the light that are made by them.
Clay can bring that magical three dimension quality that allows you to walk all the way around your characters....and....clay is just so fun to work with!
I will actually be able to draw Tiny better after I've made him with clay....works everytime!
If you want to compare this with something else in the entertainment industry, it would be like when they make a movie and they have a scene with a huge alien space ship. The film makers can either make a large scale model that they film with different kinds of lighting in a certain place to make it look real...or...they can use the computer to create the spaceship digitally eventhough it is not really there in three dimension.
So, I'm choosing to make a real model...only it's not an alien space ship, it's Tiny! (Maybe the alien spaceship is another book?! "Tiny meets a friendly alien?")
 I'm using something I can get at wal mart that is quick and dries hard without cracking...I chose the crayola product called, Air-Dry Clay. It's more like the real clay than the other kind of product I've used for years called, Supersculpty.
 I open the container and grab a hunk....feels good!!
 I get one of my drawings of Tiny and begin by making the biggest part of him first...His big polar bear shaped body. Here's the drawing I'm going from....
 I often use clay tools to help me carve things out of the shape or to trim the shape or put in details...
 I begin mushing out his legs and trying to form Tiny like I see him in the sketch above...sometimes it's hard to do and takes time. Art is hard when it is going slower than you want, but if I'm patient and do a good job, I'll be happy with the results and will have enjoyed doing it as well.
 Then I grabbed another piece of clay for the head and will need to attach it to the body...
 Since I'm just starting and I'm trying to get the size of the body and head, I realize that I have way too small a body! I reach back into the clay container and get a lot more and keep working with the clay shapes while looking at the sketch. This takes a little time. I use the tool to start putting in details...
 Good enough! This does not have to be perfect for what I will use it for. If I was making this as a gift for someone, I would spend a lot more time smoothing things out and then paint him with acrylic paint and make it look like Tiny in the book paintings. I let him dry a couple of days (air-dry clay) and now he is as hard as a rock! Good boy, Tiny!
 and here is another view...
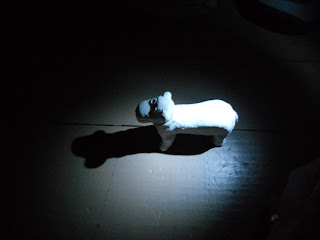
 Great. I'm happy with it. But what can I use him for to help me with the book? For one, having done this little clay figure, I've thought as Tiny as more real...what he looks like from every angle. It's helped my mind know Tiny much better. But if I had a night scene and I needed to draw Tiny in that special light as if he were under the light of an alien space ship and I didn't know how to draw the shadows that were made, look what I can do....
 Wow! This makes that scene come more alive to me in my imagination and I could paint it with more feeling and accuracy! I just took my Tiny clay model into the closet where it is dark...set him on the floor....took a small flashlight and shined it on him from above....easy, peasy! Here's another angle of Tiny in the dark with the flashlight shining on him...
 This time I made the light shine from behind him...see how it made his shadow go in front of him?
Pretty cool, huh?!
I've used making clay in other models as well. Here's 3 pictures I did of the boy, Elliot, in the book. This was going to be a christmas ornament for my publisher but I couldn't get it done in time so it remained mine. He has the viking helmet on because my publisher's company name is Viking. And the trash can lid that the boy is holding has a "v" on it for Viking. I thought they would enjoy that.


I've made lots of faces and things to help me with illustrating...here's a few from my growing collection. You will notice these are more of a flesh tone color...that is because these were not made with the crayola product but with super scupty (Hobby Lobby or Michael's has these).
 I also did a little scene with Noah on the ark. He has a lantern in his hand because I imagined the boat was pretty dark inside and the racoons (2!) are coming up to talk with him and beside him are the penguins (2 also!). This was a scene I saw in my head for a book I wrote called, One Night on the Ark (unpublished)....
 One thing you should know about super sculpty, it gets very very hard when you bake it in the oven at 275 f . But if you use a gas stove like I have in my very old house (103 years old!), sometimes you can easily burn the clay. I'm sorry to say that one of my favorite characters got toasted that way....he's a dramatic fellow reading shakespeare and making a big gesture with one arm while holding his book in the other. He's got the period hat and the handlebar mustache. Wonder what his name would be?
Maybe he's not reading Shakespeare...but Dante's Inferno!
 Last, I'll show you how I used clay figures to help me do a piece of art for a children's greeting card. I saw the 3 children and dog in my imagination but I did't know how to group them. Making them with gestures out of clay gave me a way to play with their grouping. It was a birthday card, so I had them with party hats and horn blowers...I'll show you a couple of the characters and then all of them together...
 and another
 and all together
 Once they were in the position I wanted, then I played with what was around them in the background and painted them in festive colors to go with the birthday party mood....
 All in all, clay can be a wonderful motivator and help in the making of children's book scenes...
I LOVE CLAY!

How can I do this?
CLAY TIME!
Clay has helped me many times and it will help me once again in this book. When I feel my characters are real, then it is easier for me to draw them from different directions...and to get the correct shadows from the light that are made by them.
Clay can bring that magical three dimension quality that allows you to walk all the way around your characters....and....clay is just so fun to work with!
I will actually be able to draw Tiny better after I've made him with clay....works everytime!
If you want to compare this with something else in the entertainment industry, it would be like when they make a movie and they have a scene with a huge alien space ship. The film makers can either make a large scale model that they film with different kinds of lighting in a certain place to make it look real...or...they can use the computer to create the spaceship digitally eventhough it is not really there in three dimension.
So, I'm choosing to make a real model...only it's not an alien space ship, it's Tiny! (Maybe the alien spaceship is another book?! "Tiny meets a friendly alien?")


Pretty cool, huh?!
I've used making clay in other models as well. Here's 3 pictures I did of the boy, Elliot, in the book. This was going to be a christmas ornament for my publisher but I couldn't get it done in time so it remained mine. He has the viking helmet on because my publisher's company name is Viking. And the trash can lid that the boy is holding has a "v" on it for Viking. I thought they would enjoy that.

Since it was going to hang from a Christmas tree, I made his little legs so that they were independent of the body and dangled....I used paper clip pieces to do this...

And a paper clip on top of his head so that I could tie a ribbon to hang the ornament with....it was fun painting him!

I've made lots of faces and things to help me with illustrating...here's a few from my growing collection. You will notice these are more of a flesh tone color...that is because these were not made with the crayola product but with super scupty (Hobby Lobby or Michael's has these).


Maybe he's not reading Shakespeare...but Dante's Inferno!


I LOVE CLAY!

Subscribe to:
Comments (Atom)